LEED Brakes Brake Pressure Gauge Kits
VEHICLE Shop By
LEED Brakes Pressure Gauge Kits
LEED Brakes Pressure Gauge Kits are an essential diagnostic tool for identifying performance issues in disc or drum brake systems. Designed for quick installation at the caliper or wheel cylinder bleeder port, this kit helps you accurately measure brake line pressure.
Use it to troubleshoot problems like improper master cylinder bore size, faulty proportioning valves, or power booster failure. It’s ideal for verifying front-to-rear brake bias, confirming system balance, and diagnosing both mechanical and hydraulic issues.
Click on the product image below to view more details and purchase. You can also use the Year, Make & Model search tool above to find additional LEED Brakes products for your vehicle.
Brake Pressure Gauge Kit
The LEED Brakes Pressure Gauge Test Kit makes diagnosing brake issues simple and effective. By checking pressure at the caliper or wheel cylinder, you can identify:
- Proper master cylinder bore size
- Master cylinder and power booster function
- Mechanical vs. hydraulic issues
- Faulty proportioning valve
- Front-to-rear brake bias, and more
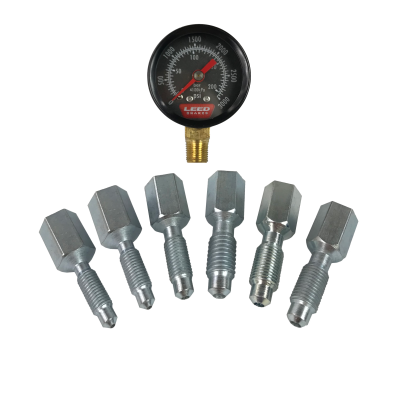
Kit Includes:
- Brake pressure gauge
- 5/16-24 adapter
- 3/8-24 adapter
- M7x1.0 adapter
- M8x1.25 adapter
- M10x1.0 adapter
- M10x1.5 adapter
- Instructions and solutions guide
Click on the product image above to view more information and purchase the kit.
Vacuum Brake Booster Testing and Diagnosis
Always test your brake booster vacuum pump for leaks.
Minimum engine vacuum required: 18”HG at idle in gear.
You will need a vacuum pump with a gauge to perform this procedure. Many chain parts stores rent, loan, or sell them.
- Remove the vacuum hose from the check valve on the booster. Attach a vacuum pump to the check valve and draw the booster down to 20”Hg.
- Let the booster sit for 5 minutes with vacuum applied. It should hold steady at 20”Hg. If not, the booster is faulty and must be replaced.
- With 20”Hg in the booster, depress and release the brake pedal once. You should see a 5–10”Hg drop. If vacuum remains at 20”Hg or drops to zero, the booster is faulty.
- Draw the booster back to 20”Hg, then hold the brake pedal down for 30 seconds. The gauge should drop slightly and hold. If it drops further, the booster is faulty.
If you have any questions about testing or brake system performance, please call LEED Brakes' tech experts at 716-852-2139.